This has never been "tested" by anyone, least of all me! Try at your own risk!
I have posted before about the join I was going to use again some day but don't remember ever posting how I do it. Therefore, here is a very short, not terribly great, tutorial that I thought might be of interest. I know this isn't going to be a super good tutorial on the pattern, because I would use different methods at the corners (and I don't write patterns well) where the joins would cross and haven't written up anything specific for them.
When I do the next afghan join this May I will devise a pattern and write up tutorial on what I do for those "cross over" areas, as well a a better tutorial all the way around. Read the whole thing before attempting as you will see that it lacks a lot of structure (the pattern as written I mean!).
First and foremost you need to crochet on each side an odd number of sc stitches…or fudge if you don't have them perfectly lined up that way. Do a sc, chain 3, sc in each corner. Fudge in the middle along the side somewhere if needed as it won't show up as much. All squares MUST have the same amount of sc stitches across each side. The next round per side would be "sc, chain 3, skip one sc, sc in next stitch; ch 3, skip stitch, sc in next stitch across each side (sc, ch3, sc in each corner). Be sure to count to make sure you have the same ch3's on each side, and each square.
No real photos of the corners. Work your corners according to how you feel comfortable considering your pattern. It could be that the ch3 would be too wide or too narrow.
Please note I am not giving instructions on how to start and stop each round. I usually start my round in the middle of a side and then join with a slip stitch and break off. Then start the next round on a different side using the Air Crochet I devised. Once I do the complete pattern I will figure it out properly!
The next round would be basically a repeat of sort of the last round; *sc in ch3 space below, ch 3; sc in the next chain 3 space*. Repeat from * to * around but do a sc, ch3, sc in each corner space again.
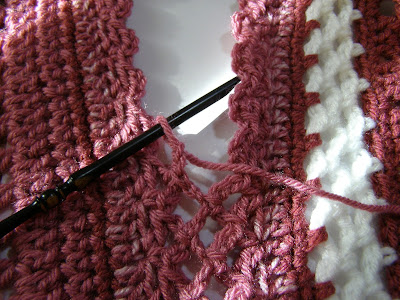
Now, when you join each square you will be using a sc in your first ch3 space, then ch2, sc in the corresponding ch3 in the joining square, ch2 and sc in the ch3 space across on the first square. You will go back and forth that way to the corners of each square.
PLEASE NOTE: Your square will be off a tad when all is said and done. See the photo of the joined three squares under the full afghan. That is because the ch3 spaces will be fitting BETWEEN the ch3 spaces on the other side. It sort of "comes out in the wash" once all the sides are finished and the border is finished. You may want to add a row of sc, ch3 across the end of the join between the squares before you put on your full border around all the joined squares. Once again, I have never claimed to be a designer so if anyone can tell me a better way, I am all ears! It is possible this could be fixed by starting the ch3's differently, but am not sure how that would be accomplished yet.
PLEASE NOTE: Your square will be off a tad when all is said and done. See the photo of the joined three squares under the full afghan. That is because the ch3 spaces will be fitting BETWEEN the ch3 spaces on the other side. It sort of "comes out in the wash" once all the sides are finished and the border is finished. You may want to add a row of sc, ch3 across the end of the join between the squares before you put on your full border around all the joined squares. Once again, I have never claimed to be a designer so if anyone can tell me a better way, I am all ears! It is possible this could be fixed by starting the ch3's differently, but am not sure how that would be accomplished yet.
To me it is a pretty join, wider than the flat braid, and lacier. I hope you try it and come back with some helpful notes! As I said I will put together my next afghan using this and will write it up in better form…maybe figure out some of the oddities I have fudged on!
Happy Monday!


